Custom iOS pull-to-refresh for Codeanywhere app
Ivo Leko
7 min read
For the Codeanywhere iOS app, there was an idea to build a custom “Pull-to-refresh” which will be in the spirit of whole app’s UI but also recognisable and intuitive to all iOS users. Here is a solution how to reproduce this effect using Quartz Core framework.
Concept “Pull-to-refresh” is one of the most popular and widespread concepts used in a mobile apps. It was designed by Loren Brichter, author of the Tweetie app for iOS. Today, patent of this concept is owned by Twitter, but they allows its use by other organisation/developers for free.
There are lot of classes that implements “Pull-to-refresh” in iOS, but certainly one of the most important is EGOTableViewPullRefresh which is available on github. With the arrival of iOS 6, Apple has built a native “Pull-to-refresh” in iOS 6 SDK as a part of the UIKit framework, called UIRefreshControl. It is still available today as part of iOS 7 SDK, but Apple significantly changes appearance which is far more simpler and better adapted to the new iOS 7 design.

Idea
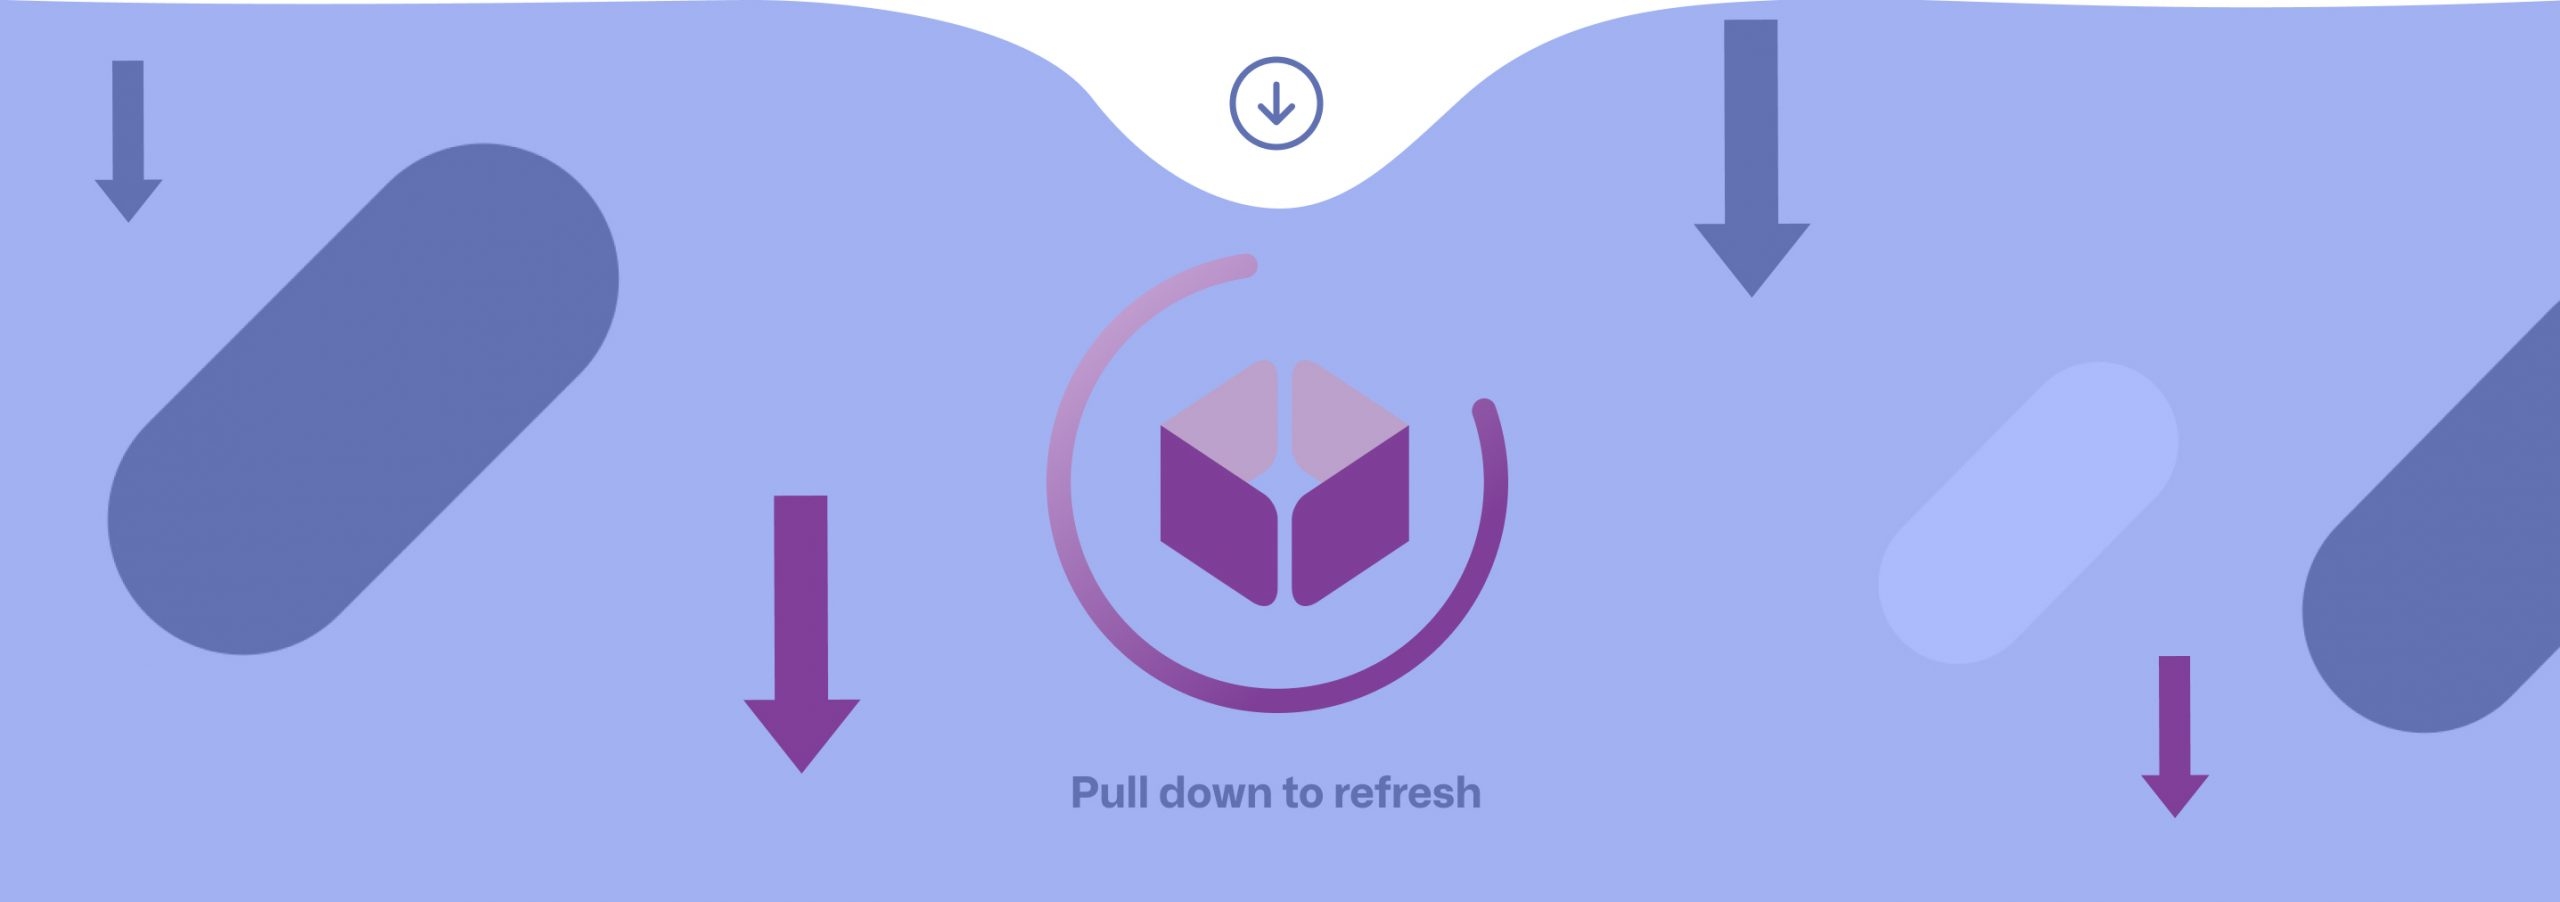
For the Codeanywhere iOS app, there was an idea to build a custom “Pull-to-refresh” which will be in the spirit of whole app’s UI and much more cool than available solutions, but also recognizable and intuitive to all iOS users. This concept is presented as two individual transitions that are dependent about the position of the finger:
1. Codeanywhere logo becomes colored
2. Circle with gradient becomes filled
You can see scenario on the image bellow, but I definitely recommend downloading and running Codeanywhere app by yourself to get the right feeling.


Solution

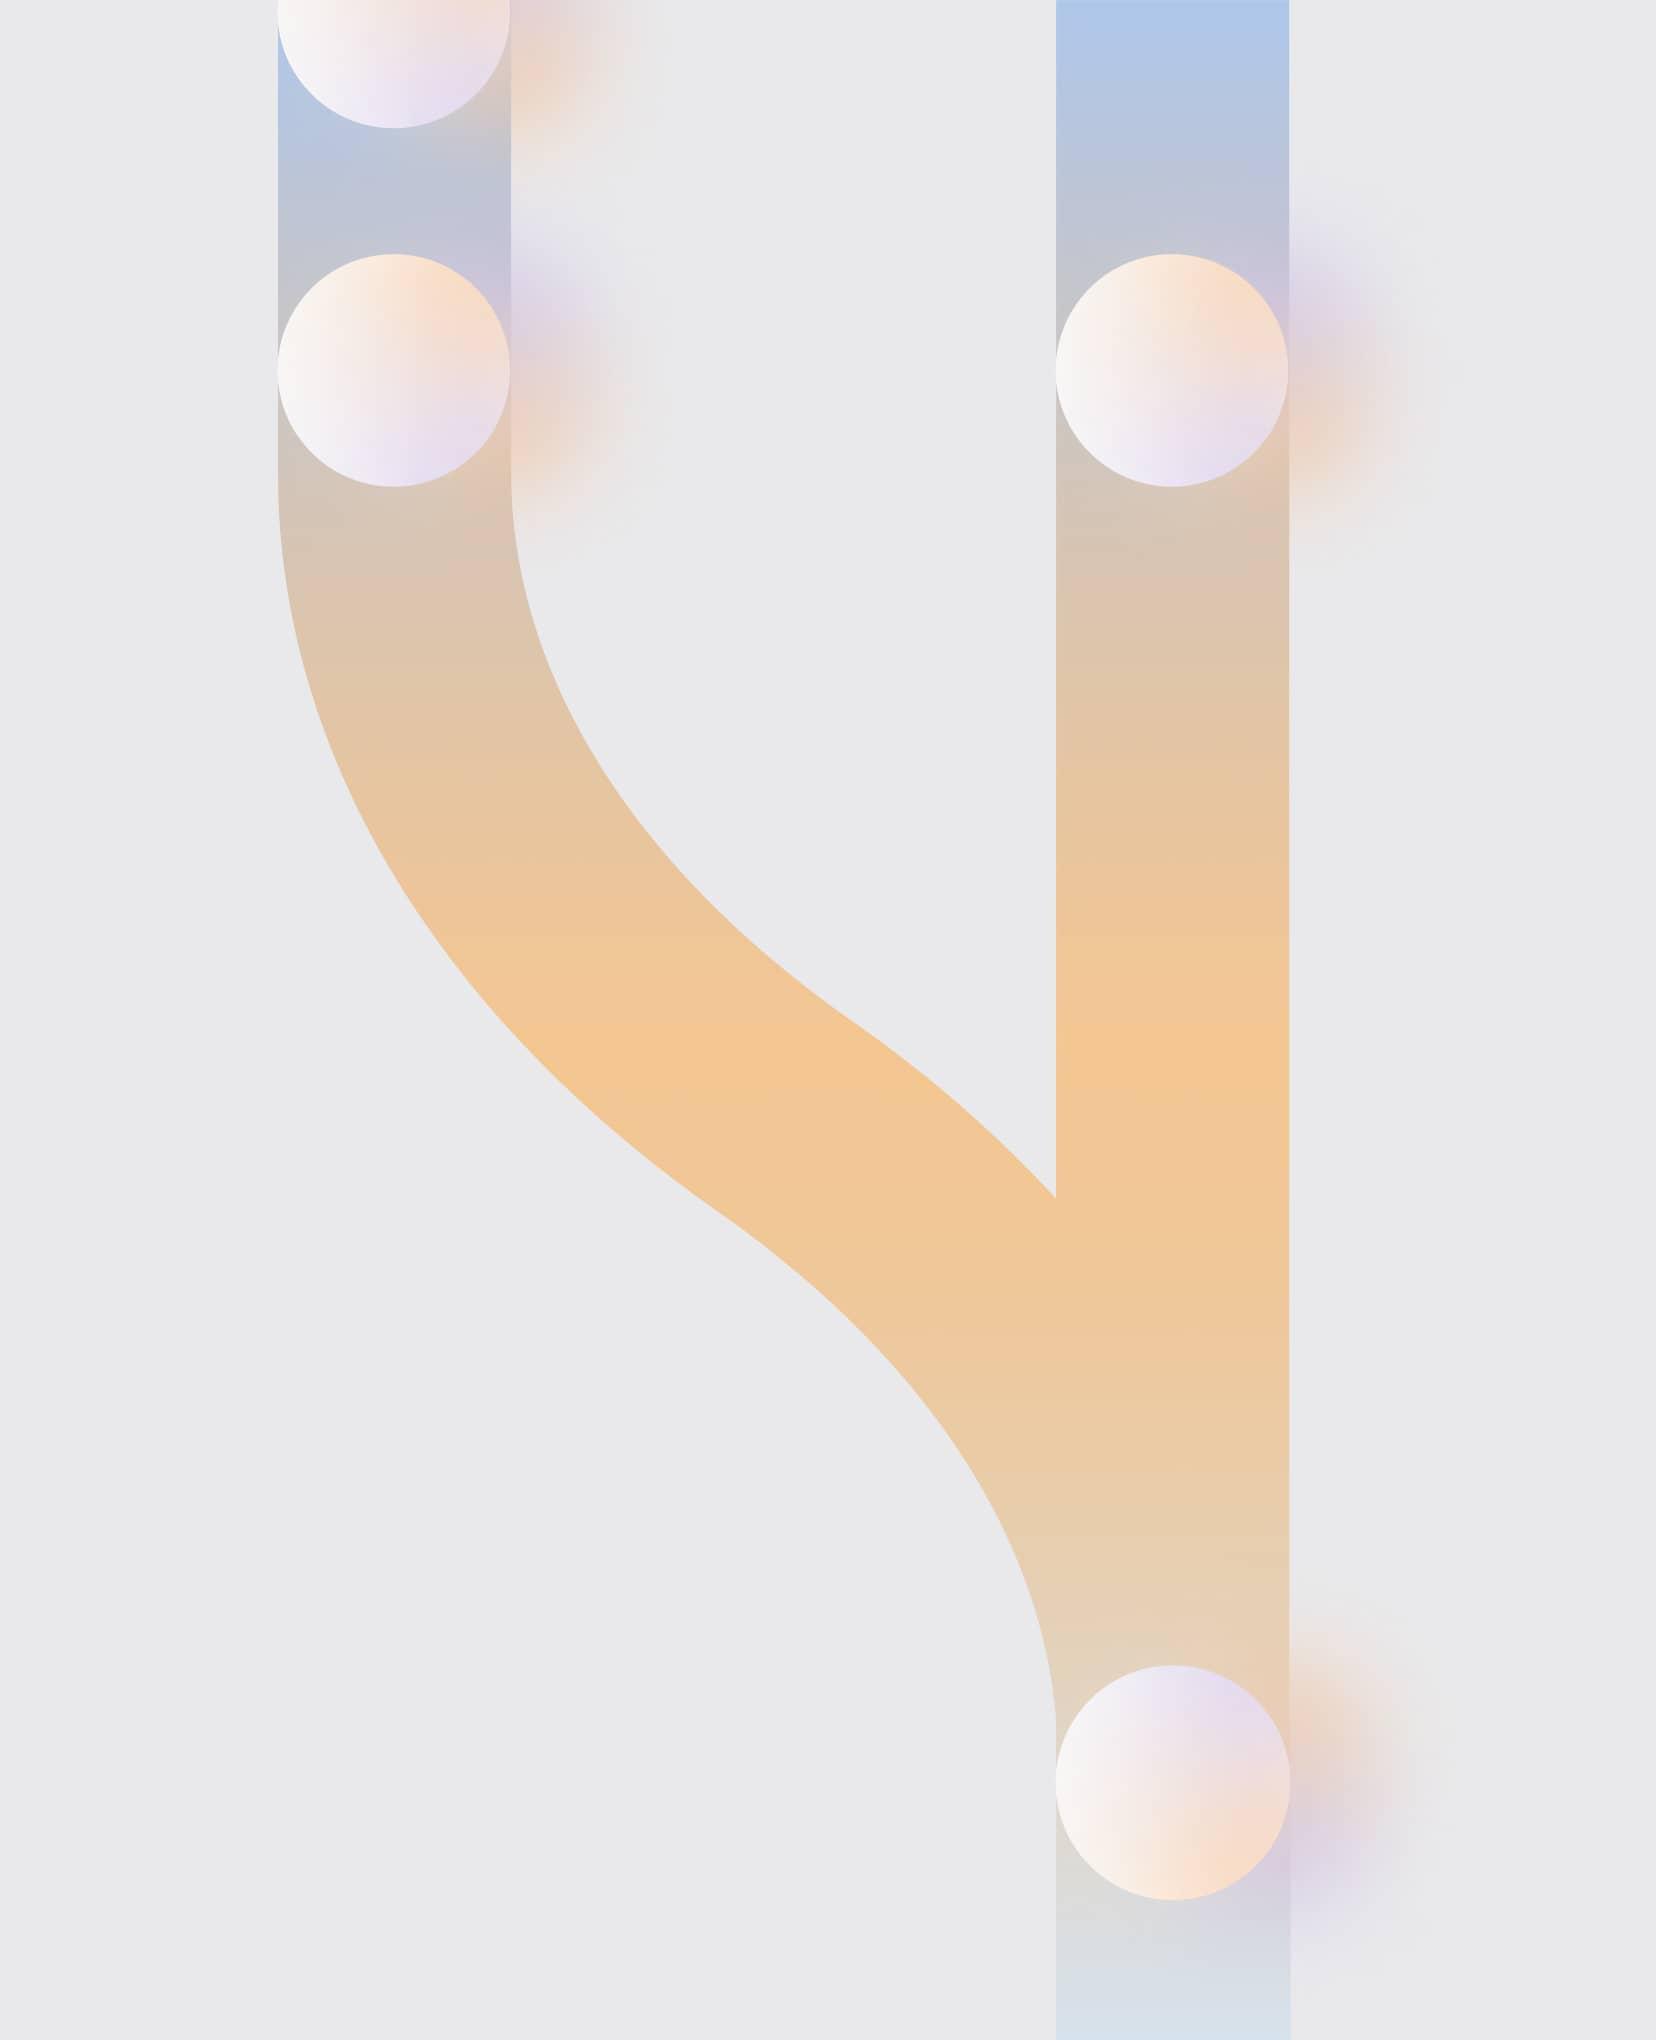
First kind of transition is very basic and easy to implement. It is actually just two images of logo, one is color image and one is not. If we put view of color image over view of non-color image, we can produce effect by changing alpha of the top view. Second one is pretty tough and much more complicated, but for this transition we need only one image with full circle. Full assets needed for this concept of “pull-to-refresh” is showed on image:
To achieve this second transition, we need to use Quartz Core Framework and it’s CALayer that manages image-based content and allows to perform animations of that content. A layer’s main job is to manage the visual content that you provide but the layer itself has visual attributes that can be set, such as a background color, shadow, path, mask and transform.
Layer’s mask is actually another layer that determines how much of the first layer’s content and background shows through (similar thing is available on Photoshop and other graphics editing programs). On the other side, transform is 4×4 matrix which can be use for rotation of circle in this example.
Image below describes how this effect is achieved. We have one parent layer (parentLayer), layer with circle image (circleLayer) that is sublayer of parentLayer and layer with pie (pieLayer) that will be used as a mask on parentLayer. When user pulls down with his finger, this is what happens:
– circleLayer rotates for X degrees from initial angle, where X is between 0 and 360 degrees
– pieLayer generates pie with angle of X degrees, where X is between 0 and 360 degrees
– parentLayer is idle, it is used just as mask holder, because pieLayer should not rotate together with circleLayer

Code
We will not go into details here, but show just critical parts of code as generating mask and making a rotation. Main method for generating scene is:
- (void) generateLayerForDegrees:(CGFloat) degrees {

[CATransaction begin];
[CATransaction setValue: (id) kCFBooleanTrue forKey: kCATransactionDisableActions];

circleLayer.transform = CATransform3DMakeRotation(degToRad(degrees), 0.0, 0.0, 1.0); //rotation of circle
[self updatePie:pieLayer forAngle:degrees]; //method that programmatically generate pie and update pieLayer
pieLayer.frame = circleLayer.frame; //need to define frame of the mask to be same as circleLayer's frame
parentLayer.mask = pieLayer; //setting mask

logoLayer.opacity=1*(degrees/360); //this line of code is used to produce 1. transition (Codeanywhere logo becomes colored)

[CATransaction commit];

}
where degToRad is simple define:
#define degToRad(angle) angle*M_PI/180.0
Now we need to write updatePie: forAngle: method. It is method that creates and updates pieLayer that we use as mask:
- (void) updatePie: (CAShapeLayer *) layer forAngle: (CGFloat) degrees {

// background color of layer
layer.fillColor = [UIColor blackColor].CGColor;

// some initial values
CGFloat angle = degToRad(-90);
CGPoint center = CGPointMake(layer.frame.size.width/2.0, layer.frame.size.width/2.0);
CGFloat radius = layer.frame.size.width/2.0;

//Creating a pie using UIBezierPath
UIBezierPath *piePath = [UIBezierPath bezierPath];
[piePath moveToPoint:center];
[piePath addLineToPoint:CGPointMake(center.x + radius * cos(angle), center.y + radius * sin(angle))];
[piePath addArcWithCenter:center radius:radius startAngle:angle endAngle:degToRad(degrees-90) clockwise:YES];
[piePath addLineToPoint:center];
[piePath closePath]; // this will automatically add a straight line to the center

layer.path = piePath.CGPath; // creating a pie layer
}
Ivo Leko
Explore more
articles
We shape our core capabilities around lean product teams capable of delivering immense value to organisations worldwide

Got a project?
Let's have a chat!
Zagreb Office
Radnička cesta 39
Split Office
Put Orišca 11, 2nd floor
Contact info
Split+Zagreb, Croatia
+385 91 395 9711info@profico.hr