Mastering Git: The Basics
Ivan Kuliš
26 min read

If you are an experienced professional developer, you are most likely on very good terms with Git. But for students and those just starting out, Git might sound as mysterious as an alien encounter.
Git is one of the most important and powerful tools used in both professional settings and for personal projects. It is instrumental for version tracking and in multi-developer workflows. The sooner it is understood, the better.
Luckily, we learned quite a bit from using Git daily, and we love to share, so welcome to our two-part Git series! Part one will cover the basics of Git, while part two will offer a deeper dive along with some real world examples.
So read on and git good at Git!
What is Git and what is it used for?
“Git is a distributed version control system that allows developers to track changes to their code and collaborate with others on software projects. It was created by Linus Torvalds in 2005 to support the development of the Linux kernel, and it has since become one of the most widely used version control systems in the world.
Git stores a history of changes made to a codebase, making it easy to see who made a particular change, when they made it, and why. It also allows multiple people to work on the same codebase simultaneously, making it a useful tool for collaboration.
Git is open source and is available for use on a wide range of operating systems, including Linux, macOS, and Windows.”
- ChatGPT
In short, Git is a Version Control System (VCS from here on). To properly define what this means, we first have to define what a VCS does and which problems it solves:
Tracking changes: Version control systems allow you to track changes that you and your team make to your codebase over time. This makes it easy to see who made a particular change, when they made it, and why.
Collaboration: Version control systems make it easy for multiple people to work on the same codebase simultaneously. You can collaborate with others by pushing and pulling changes to and from a shared repository.
Experimentation: Version control systems allow you to experiment with new ideas without worrying about breaking the main codebase. You can create a new branch, make your changes, and then merge them back into the main codebase once you’re sure they’re ready.
Reverting changes: If you make a mistake or want to go back to a previous version of your code, version control systems allow you to easily revert changes. You can use commit hashes to reference specific versions of your code, or you can use branching to create a new version of your codebase based on an old commit.
Documentation: Version control systems provide a record of the changes that you and your team make to your codebase. This can be useful for documenting the development process and for understanding how the codebase evolved.
It is important to note that Git is not the first nor is it the only VCS out there, but it is by far the most popular one and regarded as an industry standard.
The basics
Okay, Git is a VCS and it’s very useful and important. But how does it actually work?
In essence, Git has a Command Line Interface (CLI), meaning that its functions are accessed by typing various commands into a terminal. If memorizing commands is not your thing, GUI solutions exist, such as Kraken and GitLens, and they offer buttons and menus for each functionality. These are particularly handy when you are just getting familiar with Git.
The way we like to use Git in our day to day work is through the VSCode terminal, but you can use any terminal emulator of your liking. Just make sure that the terminal is open in the folder where your source code is stored. Integrated VSC terminal does this automatically.
Commit: a brief intro
Now that the technical parts are out of the way, let’s get to the ‘meat’ of Git, and the entire basis of what you will be doing within it: commit
A commit is a magical object that stores our code. You can think of it like saving a video game. Each time we invoke a commit, Git takes a snapshot of the current state of the code and stores it into a repository. We will dive deeper into this in part two, but that’s the gist of it.
Let’s go over some of the basic properties of committing:
- Git commits are linked lists with backward links: Each commit points to its parent. A parent link is a crucial part of the commit that can not be changed.
- Git commits are related to each other in multiple ways: Multiple commits can point to a single commit and this is what creates branching paths. A single commit can also have multiple parents (like merge commits).
- Git commit is immutable: This means that once a commit is created it can no longer be altered. Altering a commit would make its hash invalid.
- Everything, other than commits themselves, is a pointer (aka. refs): Branch, Stash, HEAD, and tags are pointers that point to a commit. Using these pointers it is possible to traverse the linked list of commits going backward (to the parent) since it’s a backward linked list.
Branch? Stash? HEAD? Indeed, these are new terms we haven’t covered yet. Let’s fix that!
HEAD
HEAD is a pointer to the current commit. It’s what we see at any point while working with Git. The name HEAD is convention used with linked lists where the HEAD is the pointer to the current node of the list.
Branch
A branch is a movable pointer to a commit. Compared to HEAD, the difference is that a branch always points to the latest commit in a given sublist. When multiple commits point to the same commit a branch pointer is used to keep track of the branching paths like so:

A branch can be considered a named pointer.
Tag
A tag is a named pointer similar to a branch, but it is always pointing to a single commit. We can say it is a constant pointer or a commit alias. It is usually used to version releases of software or to keep a commit handy in case we need to revert to it or cherry-pick it.
Stash
A stash is a pocket branch. Stashing a set of files is like putting them in a pocket while doing something else and then taking them out when needed. In the context of implementation, the stash is a branch whose pointer is called STASH and can be accessed by special commands like `git stash push / apply / pop`.
The stash commands are:
- git stash (push): can be used with the -u flag to stash new files (untracked) as well.
- git stash apply: the recommended way of using files applies files from stash but does not delete the stash commit
- git stash pop: same as apply but deletes the commit
- git stash list: list the stash
- git stash clear: delete all commits in the stash branch
Committing – best practices
When committing there are several things to keep in mind:
- Keep commits small and focused: Rather than trying to include a large number of changes in a single commit, keep them concise. Some good points to split into commits are:
- Creating new files or components.
- Using these new files or components
- Reworking or modifying an existing piece of code
- Installing new dependencies (ie. yarn add)
- Make commits atomic and easy to revert: A commit should be a standalone unit. Following the points above will help with this. Think about it like this: if you are told to drop / revert a set of changes, can you do it by deleting a few commits? If not, you are not commit splitting well. Another good rule can be this: if a colleague of yours asks you for a piece of code you wrote like a function or component, can you just give them a commit? Again, if the answer is ‘no’, you are not commit splitting well.
- Write descriptive commit messages: This helps other developers understand the purpose of the commit. A good rule is to always reference an issue. If there is no issue then it would be a good idea to tag the issue in a few words like “Fix header padding: <message here>”. If a tag is longer we can use the commit title and description.
- Commit often: Don’t be afraid to commit often, especially if you are working on a larger project or making significant changes to the codebase.
- Avoid large, binary files: Git is designed to efficiently track changes to text files, such as source code. Large binary files, such as images or videos, can be difficult for Git to track and can bloat the size of the repository. If you need to include large binary files in your project, consider using a Git Large File Storage (LFS) extension to manage them. A good rule of thumb: if it can be built by a script (like “make build”, “yarn install” etc.) it doesn’t have to be tracked. There are exceptions, but this is generally regarded as best practice.
Synchronizing changes in Git
Let’s say we made some changes to our branch and we are almost done. These changes are refactoring CSS files. However, our colleague has made a pull request (PR) and it has been merged into main. The changes made by our colleague include some new CSS files which need refactoring as well. We have to bring these changes and files into our branch so we can apply the refactoring on them as well. After that, we want to merge them back into main just like our colleague did.
This is the problem of code synchronization in git. Since all branches are isolated, how do we merge them? There are two ways.
Merge
Git merge is an additive command to combine multiple branches. Usually we would merge our changes to the main branch but in the case described above, we want to bring the changes from the main to our branch. To Git there is no difference between the two, meaning the flow and the commands are the same. There are 3 types of merges.
Three-way merge
The Default merge mode that creates a merge commit. It is made by comparing three points:
- Feature branch tip [Target point]: this is the commit pointed at by the branch-name commit. This is the branch we want to merge
- Target branch tip [Destination point]: this commit is pointed at by HEAD and is the target of a merge. It is also the current branch.
- Merge base / branch point / [Fork point]: this commit is calculated by finding a common ancestor commit from the other two points. Usually, this is the commit at which the first commit of the branch points to ie. a fork point
Let’s take a look at the following animation:
- The tip of the feature branch is e3475 which is the “dev” branch: this is the first point
- HEAD is pointing at 035cc: this is the second point
- The third point is the branch point found by tracing back both branches until a common commit is found. In this example, this is i18f35
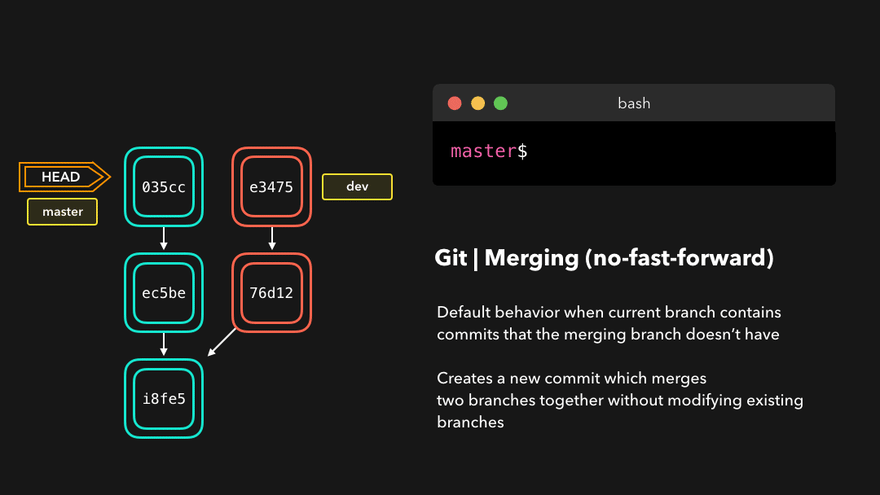
The merge commit created will point to both tips and will contain resolved conflicts of all commits between the branch tips and fork point.
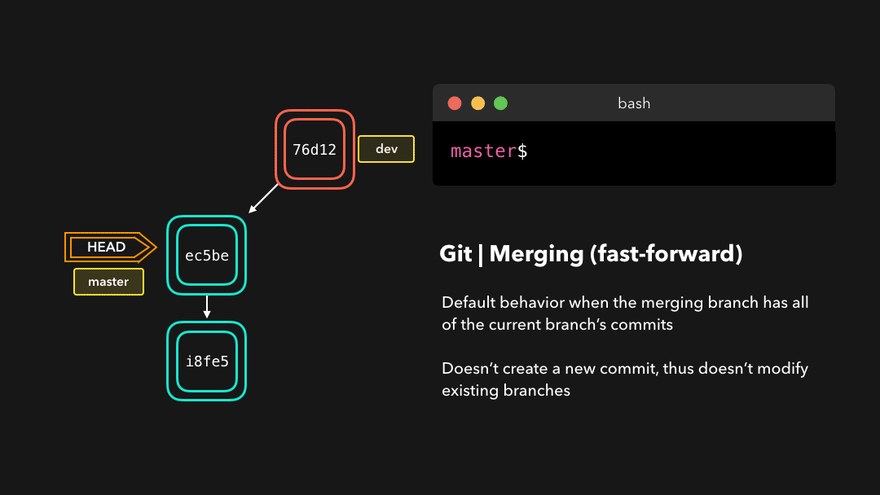
Fast forward merge
This type of merge happens if the points Fork point and Destination point are the same. In this example:
- We find the topic branch as before
- We get a commit pointed at by the HEAD (current branch)
- Turns out, the fork point and HEAD are the same commits.
If this condition is true we no longer need a merge commit. This will be true if no new commits are added to the base branch after a feature branch has been created and finished.
Instead of a merge commit, the current branch and HEAD are simply moved to the feature branch tip. Merge is finished.
Octo-merge (multi-merge)
While a rare use-case, it is possible to merge multiple branches at the same time. In that case, Fast Forward Merge is not possible. Instead, the 3-way merge is used and the algorithm is scaled to multiple branches.
There is an interesting historical footnote of the octopus merge in the Linux kernel reviewed by none other than Linus Torvalds himself. Linus reviewed the merge of 66 branches at once and this was the full comment:
On Mon, Nov 25, 2013 at 4:39 PM, Mark Brown <broonie@kernel.org> wrote:
>
> If you're OK with octopus merges for things like this I'll definitely
> take another look at using them, the enormous stack of merge commits
> always looks noisy to me in the logs and pull requests and for things
> like driver updates there's unlikely to be much doubt about which branch
> it was if there's a problem.

Christ. When you start doing octopus merges, you don't do it by half
measures, do you?

I just pulled the sound updates from Takashi, and as a result got your
merge commit 2cde51fbd0f3. That one has 66 parents.

That kind of merge either needs to be split up, or gitk needs to be
made better about visualizing it, because it ends up being *so* wide
that the history is hard to read.

I think you'll find that having that many parents also breaks old
versions of git.

Anyway, I'd suggest you try to limit octopus merges to ~15 parents or
less to make the visualization tools not go crazy.  Maybe aim for just
10 or so in most cases.

It's pulled, and it's fine, but there's clearly a balance between
"octopus merges are fine" and "Christ, that's not an octopus, that's a
Cthulhu merge".

                Linus
Image of Cthulhu for reference.
Rebase
⚠️ Changes history! ⚠️ Using this command might require you to force-push
A mythical command used by skilled developers and plebs alike. It is also the cause of a lot of pain for Git beginners since it rewrites history and can cause commit duplication and history divergence.
It solves the same problem as the merge command but in a different way. Instead of creating a merge commit and linking the target branch, it simply moves the fork point to the tip of the target branch. It then looks like the rebased branch has been just created from the new fork point. This is the history rewrite part.
It is important to note that Git commits are immutable. This means that what rebase is doing is actually impossible. Rebase can’t modify the commit’s parent but it makes it appear like it does. The way this is done is by creating a new commit on top of the new base and copying the old commit content. We can look at these commits as clones of the original commits. The originals are therefore not lost. They are just inaccessible or orphaned.
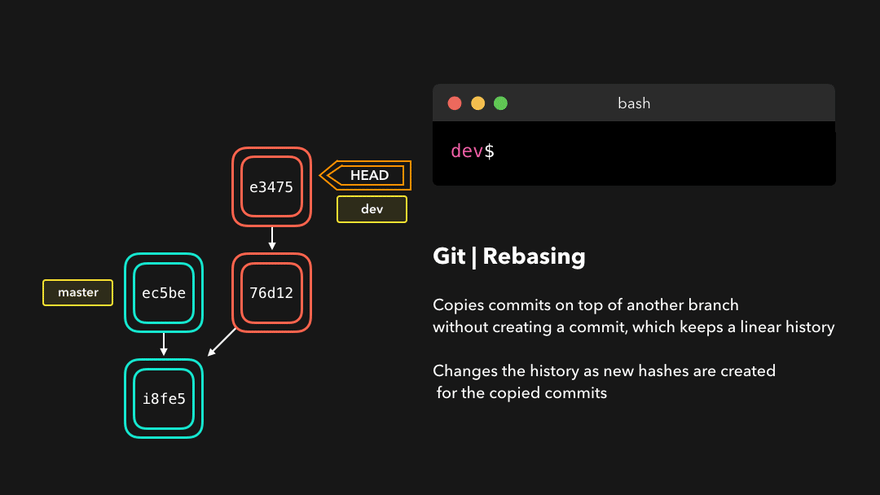
Notice the change in the hash of the commit. This proves a new commit is created. Since the history is now rewritten, the push is not possible without a pull first.
This creates an interesting problem: the commits on the remote branch are the original non-rebased commits and the local ones are clones. This means that conflicting commits are the same and they conflict with their clones. Weird!
The issue is solved by force push done with the – -force or -f flag.
Force push
Force push will delete a remote branch and replace it with a new modified local branch. It will not push into the remote branch, it will push over it! This is very important to understand. All other collaborators working with the modified branch will no longer be able to push or pull to it because of the history differences. Git refers to this as divergent branches. This can be resolved by resetting the local branch to the remote branch by git reset –hard command explained later in this post.
Force with lease
If a colleague pushes to the remote branch and we do not pull their changes and do a force push, the changes will be lost and the branch replaced with our own code which doesn’t have these changes. This behavior is expected for the force push. There is a softer version of force push: force with lease. It can be added as a flag to git push like so:
git –force-with-lease. This command will fail if the remote branch has changes not present at our local branch. This will prevent the overwrite of someone else’s code.
Reset
⚠️ Changes history! ⚠️Using this command might require you to force-push
Git reset simply moves the HEAD and the current attached branch to a specified commit. If we move our HEAD three commits backward, the new HEAD points to the older commit, and the history is essentially rewritten. It is like the three commits we jumped over never happened. At this point, we can create new commits.
If you are wondering about the skipped commits, fear not! They are not lost, just unreachable, same as with rebase. Such commits are sometimes called orphaned commits since they can not be reached by following a branch. Resets can be soft and hard.
Soft reset
A soft reset will keep the files of lost commits in the unstaged state.
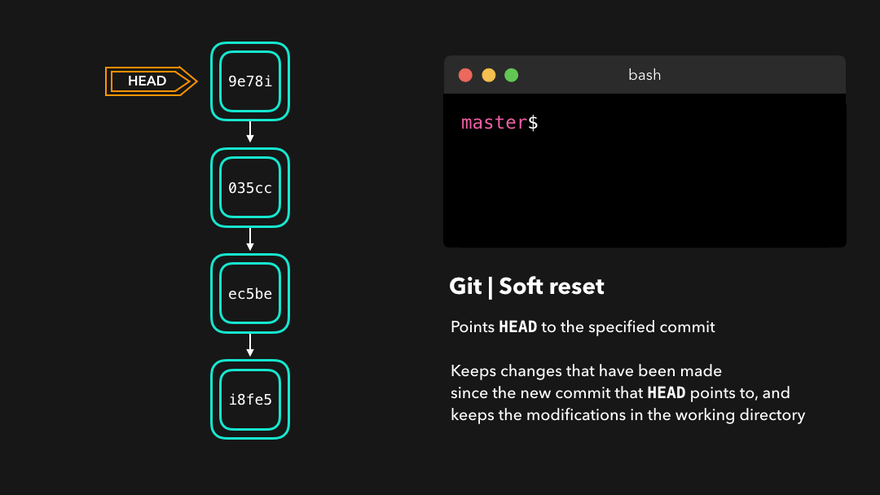
As shown in the animation above, the files are still present and can be committed in a new commit. This can be used to squash multiple commits together. Let’s say we want to squash the last 3 commits:
- We soft reset the 3 commits:
git reset –soft HEAD~3 - We stage and commit the unstaged files from these commits:
git add . && git commit -m “All for one, one for all!”
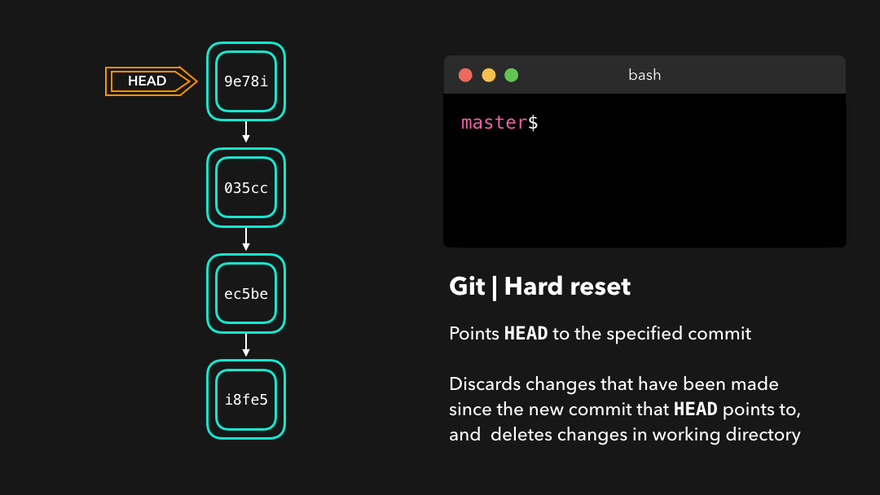
Hard reset
Hard reset does the same thing but does not keep the files. Any file changes will be discarded. This is the only difference between the two reset modes. In the animation below this is misrepresented by the deletion of the commits but in both cases, these commits are undone and unreachable. The only difference is the temporary preservation of the files from these commits in the soft mode.
Reflog
Git never loses any files and every change is reversible. There are several ways to find a lost change or commit but the quickest and easiest way is to use git reflog.
Reflog gives us a list of all of the commits to which the HEAD has pointed. It is an ordered history of the HEAD movement. Reflog is usually used to find lost commits, undo mistakes or check out our Git steps in the repo.
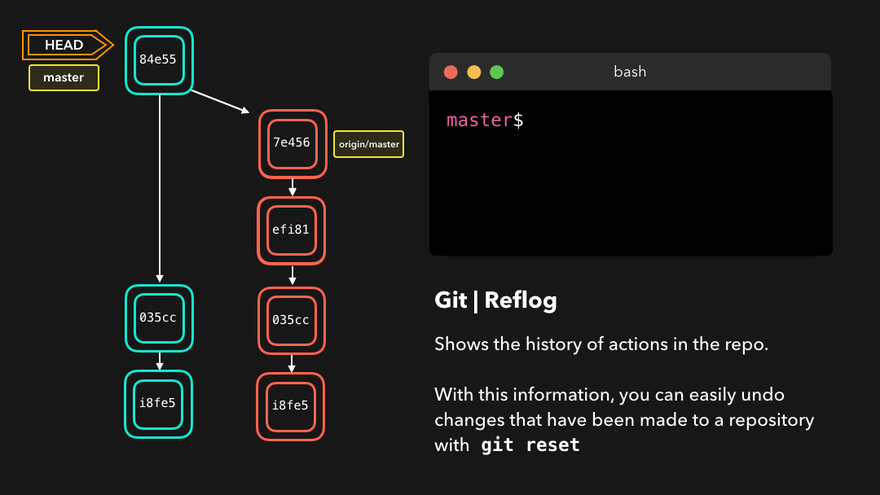
Reflog notation is HEAD@{number}, where HEAD@{0} denotes the latest change, HEAD@{1} the one before it and so on.
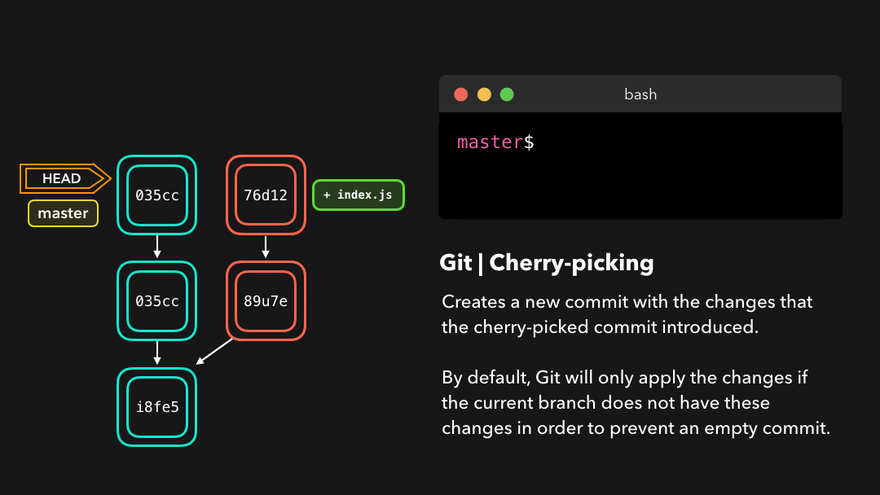
Cherry-pick
When a certain branch contains a commit that introduces changes we need on our active branch, we can cherry-pick that commit! By cherry-picking a commit, we create a new commit on our active branch that contains the changes that were introduced by the cherry-picked commit.
Unlike the commands earlier, this does not rewrite history and is totally safe to use. During a merge and rebase the cherry-picked commits will be skipped over if the base branch already has them.
Example: Committing to the wrong branch
This happens more often than we are willing to admit. The commit “Topic C2” should have been at the topic branch, not on the master. So how do we move it?
- By using cherry-pick we can move the commit to the topic branch but first, we have to move to the topic branch with git checkout topic
- Now we copy the commit from the master git cherry-pick master
- We move back to the master branch with git checkout master
- After the commit is at the right branch we should remove it from master by git reset –hard master~1 or, since we are at master branch, by git reset –hard HEAD~1

And there you have it! You are now armed with everything you need to know to get started with Git. What’s the next step? Trying things out on your own, of course! Git is an extensive topic, and if some of the things covered here are not 100% clear, don’t worry. Once you start playing around and observing the results, things should fall into place very quickly.
Stay tuned for part two where we will examine Git’s architecture, along with some examples we prepared from actual project workflows. This should give you a sense of how it is used in the real World by the best digital product agency ever (a totally unbiased opinion).
Ivan Kuliš
Software engineer
Hi there! My name is Ivan and I am a Full stack developer at Profico. I am passionate about technology, especially lower-level stuff and I enjoy taking a look under the hood of tools and technologies we use every day. I am an assistant teacher at the Faculty of Electrical Engineering, Mechanical Engineering, and Naval Architecture (FESB) in Split, Croatia. I enjoy teaching, writing, and doing presentations.
Explore more
articles
We shape our core capabilities around lean product teams capable of delivering immense value to organisations worldwide


Got a project?
Let's have a chat!
Zagreb Office
Radnička cesta 39
Split Office
Put Orišca 11, 2nd floor
Contact info
Split+Zagreb, Croatia
+385 91 395 9711info@profico.hr